
I’m having cuteness overload here! How sweet is this little crochet pink and white trimmed gingerbread house? I loved designing and making it. In contrast to my previous gingerbread house designs, I’ve chosen a yummy pink and white color scheme for the frosting and candy. The whole thing is mostly single crochet and chains, and crocodile stitch for the roof. I’ve divided the tutorials into three posts. We’ll talk more about those pieces in Part 2. Here are the links:
Part 1: This post. Gathering materials and making the chipboard support structure
Part 2: Crocheting and affixing the gingerbread parts
Part 3: Frosting and candy decorations
Candy Cottage Gingerbread House Tutorial Part 1
Gathering materials and making the chipboard support structure
Finished house size
9″ tall x 10″ wide x 8″ deep
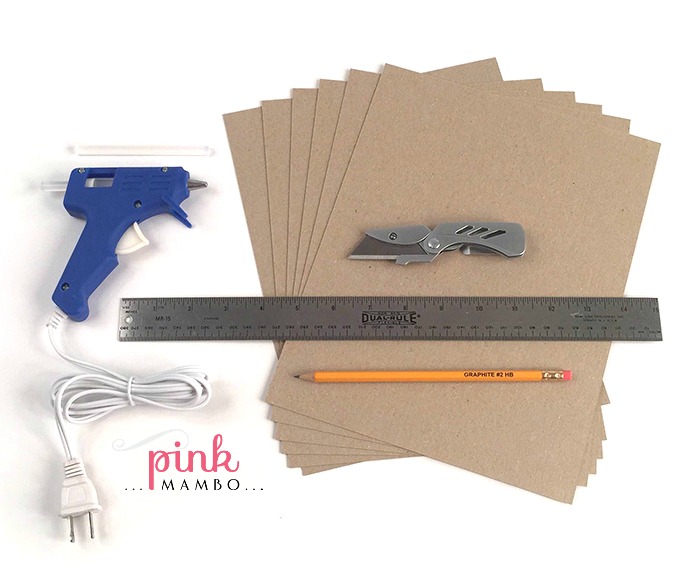
Materials
For chipboard support structure
- 6 pieces of 8.5 x 11 inch chipboard or cereal box sides
- Hot glue gun w/glue sticks
- Utility knife
- Ruler or straight edge
- Pen or pencil
- PDF template
For crochet pieces
Worsted/aran weight yarn (I used I Love This Yarn by Hobby Lobby in Toasted Almond, White, Pink and Soft Pink
- 425 yds/389m tan
- 100 yds/92m white
- 40 yds/37m light pink
- 25 yds/23m pink
Size G/6/4.00m crochet hook
Tapestry needle
 Instructions for Chipboard Support Structure
Step 1:
Save or print your pdf with pattern pieces for Chipboard Support Structure here.
Print the pdf template pages and temporarily tape each to a piece of chipboard.
Cut out the outlined patterns.

Lightly score the fold lines with ruler and utility knife. Only scratch the surface, do not cut.
Turn the chipboard over, score side down, and bend each fold up 90 degrees.

Step 3:
Glue the side walls to the front and back walls.


Glue the two roof pieces together along the roof peak (not shown).
Step 4:
To center the roof, make evenly spaced reference marks on the inside of the roof, using the base of the front or back wall as a guide.

Step 5:
Glue the curved roof one tab at a time to the front and back walls.
I hope you will enjoy getting your materials together and making this little chipboard house to adorn with crochet gingerbread, frosting and candies!


I can’t wait to make this darling gingerbread house! Thank you for sharing your amazing talent with us! Do you think cereal boxes would be sturdy enough for the chipboard?
Yes! I’ve added that to the instructions, thank you. Cereal boxes would be perfect for this!
Carolyn
OMG this is stunning. I love it. It’s so cute. I’m gonna make this gingerbread house. Thank you so much. Hugs Carla.
Thanks very much for your sweet comment Carla! I’m so happy you are going to make it?????
Just love this super cute gingerbread house and can’t wait to make it, Thank You for sharing it! Your AWESOME!!!!
I’m so glad you are delighted with it Lucinda! It’s such an honor to have people be so happy with my creations ????
Such a lovely project for the holidays . . . Thank you so much for sharing your hard work and creativity . . . Absolutely delightful!!!!
Thanks very much Darlene! I am so glad you love it ???
i cant find the crochet pattern
Diana. it looks like part two of this tutorial will come out on the 23rd.
Wow! Thats great! Thank you very very much for this pattern. My heart goes shalla la la la 😉 Love, Marie
Thanks so much Marie! Shalalala reminds me of the song Brown eyed Girl which I sing to my granddaughter ????
Love this! I also wanted to let you know your link to your other gingerbread house patterns is broken.
Thanks very much Jodi! I fixed it ????
Are there crocheted directions for the gingerbread house
Yes! There is a schedule for the series in the post.
I know someone else already said, but your Ravelry link to your other crochet patterns is broken. It’s missing the ttp:// part.
Thanks Stephanie I fixed it ????
I’ve made up the house using cereal boxes, been and added more yarn to my stash and now I’m itching to so start crocheting it – thanks for this – is super cute 🙂 X
Yay this will be great! 🙂 🙂
I am always late to the crochet party and now I’m early! The 23rd needs to hurry UP!
I agree Melissa! I can’t wait to see everyone’s houses!
I just found your website yesterday, Saturday, and signed up for the email. Is it possible I could get the Thanksgiving item you mentioned at the end of this info, please? I adore this pattern and, as soon as money eases up a bit, I will be buying several of your wonderful patterns. Thank you so much for the fabulous ideas.
Yes certainly, Sharon. Please email me at carolynchristmas@gmail.com and I’ll send you the Thanksgiving item. Thanks for your kind words!
I will make the supporting material with plastic canvas which can be cut and shaped and the edges can be sawn together if I work the wall and roof seams right I can fold the house flat better for store after the holiday season
I just finished up making this today! I want to make a bazillion they are so cute! Thanks for the pattern!💜
Thank you Amanda! I love your sweet blog 🙂
I don’t see a chipboard piece for the bottom of the house? Am I missing something? TI A
Thank you so much! This is wonderful!
OMG this is a cute gingerbread house and I surely gonna make this one.My daughter is 36 years young
and she wanted a gingerbread house So she is gonna get one! Thank you very much for sharing
The link for the PDF template isn’t pulling anything up. Could you tell me the sizes I need to cut in the cardboard? Thank you for this beautiful pattern!
I am in the middle of crocheting your gorgeous Candy Cottage Gingerbread House and I printed out the instructions
but the instructions for the front and back walls of the house are missing. Could you please forward them to me or tell me where I can find the instructions. Thank you. I am going to attempt to make TWO of them: one for each of our
adorable granddaughters. One is 9 and the other is 6. They will absolutely love them.
Hello, I would love to give it a try and would love to ask I didn’t see the crochet part of the house in this post
This is a magical little house! I’m going to make two for my little granddaughters! Thank you for sharing this! So adorable!